How To Roast Coffee Beans In The Oven?
Roasting coffee beans in your oven is a simple way to enjoy fresh, custom-roasted coffee at home. You don’t need expensive machines or advanced skills—just a few kitchen tools and some patience. Oven roasting lets you control the flavor and freshness, and it’s a fun process for any coffee lover.
If you’ve ever wondered how to turn raw, green coffee beans into aromatic, flavorful coffee, you’re in the right place. This guide will walk you through every step, explain what to expect, and help you avoid common mistakes.
How To Roast Coffee Beans In The Oven
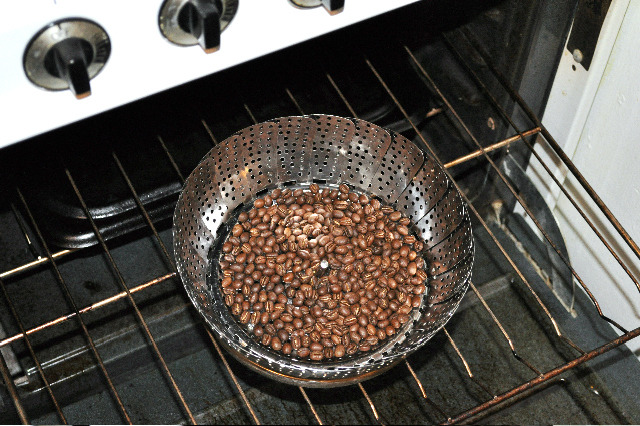
You can roast coffee beans in a regular kitchen oven by spreading green coffee beans in a single layer on a baking tray, then baking them at high heat (usually between 220–250°C or 430–480°F). The process usually takes 10–20 minutes, depending on the desired roast level.
Stir the beans every few minutes for even roasting, and cool them quickly after roasting to stop the cooking process.
Roasting coffee beans in the oven is a straightforward process, but there are important details to get the best results. Let’s break down each step clearly.
Aroma 18Qt Electric Roaster Oven With High Dome Lid Review: Tested &Reviewed
1. Gather Your Tools And Ingredients
You need just a few items:
- Green coffee beans (buy from a trusted roaster or online)
- Oven (gas or electric, both work)
- Baking tray (a perforated tray is best for air circulation, but any tray will do)
- Oven mitts
- Wooden spoon or spatula
- Colander (for cooling)
- Timer
- Flashlight (optional, to check color)
- Metal bowl (helps with cooling)
- Thermometer (optional, for accuracy)
A kitchen scale is useful to measure beans, but not essential. One cup of green beans will yield about three-quarters of a cup of roasted beans.
2. Preheat Your Oven
Set your oven to 220–250°C (430–480°F). The exact temperature affects the roast, so it’s worth experimenting. A hotter oven roasts beans faster, but the risk of uneven roasting is higher. Preheating ensures even heat when you start.
3. Prepare The Beans
Spread the green coffee beans on your baking tray in a single, even layer. Avoid stacking beans on top of each other. Good air flow and even exposure to heat are key. If you have a perforated tray, use it—this improves air circulation and helps chaff (the thin skin on beans) fall away.
4. Start Roasting
Place the tray on the oven’s middle rack. Set your timer for 10 minutes to start, but expect the full roast to take 10–20 minutes. Keep the oven door closed for the first few minutes to trap heat.
5. Stir Regularly
Every 2–3 minutes, open the oven and use your spoon or spatula to stir the beans. This step is vital. Oven heat is less even than commercial roasters, so stirring prevents burning and ensures even color. Be quick—too much open-door time lets heat escape.
6. Listen And Watch For Color Changes
Coffee roasting is about timing, but also senses. Beans go through several stages:
- Yellowing (after 3–5 minutes): Beans turn from green to yellow and smell grassy.
- First crack (8–12 minutes): Beans make a cracking sound—like popcorn popping. This marks a light roast.
- Second crack (12–16 minutes): A quieter, more frequent crackling. This is medium to dark roast territory.
Watch the color: from pale, to golden, to light brown, to dark brown. Use a flashlight if your oven light is weak.
7. Decide Your Roast Level
Roast level affects flavor, aroma, and caffeine content. Here’s a simple guide:
| Roast Level | Color | Flavor Profile | Time (approx.) |
|---|---|---|---|
| Light | Tannish-brown | Bright, acidic, fruity | 10–12 min |
| Medium | Brown | Balanced, sweet, complex | 12–15 min |
| Dark | Dark brown | Bold, chocolatey, low acidity | 15–20 min |
If you like more acidity and fruit, stop after the first crack. For fuller, bolder taste, wait for the second crack.
8. Remove And Cool Immediately
Once the beans reach your preferred roast, remove the tray using oven mitts. Transfer the beans quickly to a metal bowl or colander. Stir or shake them to cool and stop further roasting. This “quenching” step is important—if you leave beans on the hot tray, they may over-roast.
9. Remove Chaff
Chaff is the thin, papery skin that comes off beans as they roast. It’s harmless, but it can make your coffee taste dusty. To remove it, shake the beans in your colander over the sink or outside. Blowing gently helps, but be careful—the chaff is light and messy.
10. Rest And Store The Beans
Freshly roasted beans release carbon dioxide (CO2) for 12–24 hours. Store them in a loosely covered container (not airtight at first) to let gas escape. After a day, seal them in an airtight jar, away from light, heat, and moisture.
Coffee is best brewed 24–72 hours after roasting, but you can taste it right away if you’re curious.
Why Roast Coffee Beans In The Oven?
Roasting at home gives you control over flavor, roast level, and freshness. Store-bought coffee loses its aroma quickly—beans start going stale within two weeks of roasting. With home roasting, you always have fresh coffee.
Oven roasting is also budget-friendly. You avoid buying expensive machines, and you can experiment with small batches. Plus, it’s a hands-on process—seeing and smelling the changes teaches you about coffee in a way pre-roasted beans never could.
Common Mistakes To Avoid
Even simple methods have pitfalls. Here are mistakes many beginners make:
- Skipping Preheating: Cold ovens roast unevenly, leading to burnt or underdone beans.
- Crowding the Tray: Too many beans block airflow and roast unevenly.
- Not Stirring Enough: Without stirring, beans near tray edges roast faster than those in the middle.
- Waiting Too Long to Cool: Beans keep cooking after removal—cooling quickly is key.
- Ignoring Chaff: Leaving chaff in with your beans can affect taste and create mess in grinders.
- Storing Too Soon: If you seal beans while they’re still degassing, containers can pop open (or coffee can taste off).
How Oven Roasting Compares To Other Methods
Home roasting can be done in several ways: oven, stovetop, popcorn popper, or specialty roaster. Here’s a quick comparison:
| Method | Pros | Cons | Best For |
|---|---|---|---|
| Oven | Simple, accessible, low-cost | Uneven roast, smoky, messy chaff | First-timers, small batches |
| Stovetop Pan | Control, quick stirring | Hard to get even color, can scorch | Hands-on experimenters |
| Popcorn Popper | Even roast, fast | Small batches, can burn out popper | Hobbyists |
| Drum Roaster | Professional, consistent results | Expensive | Serious home roasters |
Oven roasting stands out for its low barrier to entry. If you have an oven, you can start today.
How To Choose Good Green Coffee Beans
The quality of your coffee depends on your beans. When buying green coffee beans, consider:
- Origin: Single-origin beans have unique flavors (Ethiopian = fruity, Colombian = balanced).
- Freshness: Buy from sellers who ship soon after harvest.
- Processing: Washed beans are clean and bright; natural-processed have heavier, fruitier notes.
- Screen size: Larger beans roast more evenly.
- Grade: Specialty grade means fewer defects.
Try a small amount before buying in bulk. Some suppliers offer sample packs.
Safety And Ventilation
Roasting coffee in the oven produces smoke, especially at darker roasts. Open a window, turn on the kitchen fan, or use an extractor hood. Never leave the oven unattended—beans can burn fast near the end. Also, hot trays and beans can cause burns, so use mitts and be careful.
Roast Levels And Flavor Changes
Roast level doesn’t just change color—it transforms flavor. Here’s how:
- Light roast: More acidity, floral and fruit notes. Higher caffeine by volume.
- Medium roast: Balanced sweetness, more body, less acidity.
- Dark roast: Bittersweet, chocolatey, sometimes smoky. Lower perceived acidity.
Did you know? Light roasts retain more of the bean’s origin flavors, while dark roasts highlight the roasting process.
Storage Tips For Roasted Coffee
Proper storage keeps your coffee fresher, longer. Here’s what to do:
- Cool beans fully before sealing.
- Use airtight containers after degassing (12–24 hours).
- Keep away from heat, light, and moisture.
- Do not freeze unless you have a large amount—freezing can cause condensation and flavor loss.
Ground coffee loses flavor much faster than whole beans. Grind just before brewing for best taste.
Two Insights Many Beginners Miss
- Oven Roasting is Smoky: Even at home, coffee roasting creates smoke and strong smells. It’s not dangerous but can set off smoke alarms. Plan ahead—ventilate well, or roast when you can open windows.
- Roast Loss is Real: Green beans lose 12–20% of their weight during roasting (mostly water loss and chaff). If you start with 100g, you’ll end with 80–88g. Always roast a little more than you need.
Troubleshooting: If Your Beans Don’t Taste Right
If your roasted coffee tastes off, try these fixes:
- Sour or grassy: Try roasting longer, or let beans rest 1–2 days before brewing.
- Bitter or burnt: Roast for less time, or lower the oven temperature slightly.
- Uneven color: Stir more often, or use a thinner layer of beans.
Experimenting is normal. Keep notes on temperature, time, and results.
Is Oven Roasting Coffee Worth It?
For many people, the answer is yes. You get fresh, flavorful coffee, learn more about the process, and can create custom blends. It does take practice and patience, but the rewards are worth it. If you want to dive deeper into coffee science, you can explore resources like Wikipedia’s coffee roasting page.
Frequently Asked Questions
How Long Does It Take To Roast Coffee Beans In The Oven?
It usually takes 10–20 minutes to roast coffee beans in a home oven. The exact time depends on your oven, the bean type, and your preferred roast level (light, medium, or dark). Stirring every few minutes and watching for color and the “crack” sounds will help you nail the timing.
Can I Use Any Oven For Roasting Coffee Beans?
Yes, you can use both gas and electric ovens. A convection oven with a fan can help with even roasting, but any kitchen oven works. Make sure you have good ventilation to deal with smoke.
Do I Need Special Trays Or Equipment?
No special equipment is required, but a perforated baking tray helps with airflow and chaff removal. A simple baking tray, oven mitts, and a colander for cooling are enough to get started.
Is Home-roasted Coffee Better Than Store-bought?
Home-roasted coffee is usually fresher and more flavorful than store-bought beans, especially if you use the beans within a week of roasting. You also control the roast level and can try different origins. However, it takes practice to get consistent results.
How Should I Store Roasted Coffee Beans?
Let roasted beans rest for 12–24 hours in a loosely covered container, then transfer to an airtight jar away from light, heat, and moisture. Use within two weeks for the best flavor.
Roasting coffee beans in your oven is a rewarding process that opens up a world of flavors and aromas. With a little practice, you’ll enjoy coffee that’s fresher than anything you can buy—and you’ll understand your cup like never before.